Where Is the Fuse Located on an Electric Bike?

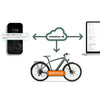
Just like any gadget that uses electricity, keeping your e-bike’s electrical system safe is super important. Fuses are tiny but crucial parts that protect your e-bike—they stop electrical components from getting damaged if there’s too much electricity or wiring faults. In this article, we’ll break down what e-bike fuses do, where you’ll usually find them, and how to check or replace them easily—all to keep your e-bike running safely and smoothly.
What Is a Fuse?
A fuse is a safety part that guards your e-bike’s electrical circuits. Here’s how it works: if too much electricity (called “overcurrent”) flows through the circuit—like from a wiring fault—it cuts off the power right away. Its main job is to protect key parts of your e-bike, such as the motor, battery, and controller. Without a working fuse, those parts could get damaged, your e-bike might stop working, or in rare cases, there could even be a fire risk.
There are two common types of fuses in e-bikes:
· Blade fuses: These are the most popular because they’re easy to put in and take out—no fancy tools needed.
· Cylindrical fuses: These look like small tubes. They can add extra protection, depending on how your e-bike’s electrical system is designed.
Where Are Fuses Typically Installed in Electric Bikes?
E-bike fuses are almost always in one of two main spots—both places help protect the whole electrical system:
1. Near the Battery
In most e-bikes, the fuse is either built right into the battery’s case or sits right next to the battery. This makes sense because the battery is the main power source—so the fuse here stops too much electricity from reaching any part of the e-bike that runs on battery power. If there’s a problem (like a short circuit), this fuse shuts things down fast to prevent damage.
2. Inside the Controller
The “controller” is the part of your e-bike that handles key jobs: starting the bike, speeding up, slowing down, and making sure the motor and battery work together smoothly. Since it’s so important, many e-bikes have a fuse inside the controller too. This extra fuse protects the controller itself and the parts it connects to (like the motor).
How to Check and Replace a Fuse
Checking or replacing a fuse is easy—you don’t need to be an expert. Just follow these steps, and always put safety first:
Step 1: Find the Fuse
1. First, locate your e-bike’s battery and controller. If you’re not sure where they are, check your e-bike’s manual—every model is a little different.
2. The manual will also tell you how to access the fuse (like if you need to unscrew a cover).
Safety First: Important Precautions
· Disconnect the battery first: Always unplug or remove the battery before touching any electrical parts—this way, you won’t get shocked.
· Wear gloves: Protective gloves keep your hands safe from sharp edges or small electrical parts.
· Stabilize the bike: Put your e-bike on a flat, steady surface so it doesn’t tip over while you work.
Step 2: Tell If the Fuse Is Blown
A “blown” fuse is one that’s stopped working. Here are two simple ways to check:
1. Look at it: Most fuses have a clear plastic cover. Peek inside—if the tiny metal strip (or wire) inside is burnt, melted, or broken, the fuse is blown.
2. Use a multimeter (if you have one): A multimeter is a small tool that checks if electricity can flow through a part. Set it to “continuity” mode (that’s the setting with a sound icon). Touch the multimeter’s two probes to both ends of the fuse. If it beeps, the fuse is good; if not, it’s blown.
Step 3: Replace the Fuse
1. Grab your tools: You’ll need a screwdriver (to open any covers), a new fuse (make sure it’s the same type and “amperage” as the old one—check the old fuse for a number like “5A” or “10A”), and maybe pliers (to pull out a tight fuse).
2. Remove the old fuse: Gently pull the blown fuse out of its holder.
3. Put in the new fuse: Slide the new fuse into the holder. Make sure it’s lined up correctly—if there are +/– marks, match them (putting it backwards can damage the circuit).
What to Do If a Fuse Fails
First, know the signs of a blown fuse—these are the most common:
· Your e-bike won’t start: You press the power button, and nothing happens (even if the battery is charged).
· Sudden power loss while riding: Your e-bike slows down fast or shuts off completely mid-ride, with no obvious reason (like a dead battery).
If you see these signs:
1. Check the fuse first (using the steps above) and replace it if it’s blown.
2. If the new fuse blows right away, or the problem comes back, there’s probably a bigger issue (like a wiring fault or a problem with the motor). Don’t try to fix this yourself—take your e-bike to a professional repair shop.
Conclusion
Fuses are small, but they’re one of the most important safety parts on your e-bike. They protect your bike’s key components and keep you safe while riding.
The best way to keep your e-bike reliable? Check its fuses regularly (along with other electrical parts) as part of your normal maintenance. A quick fuse check takes just a minute, but it can save you from big problems later!